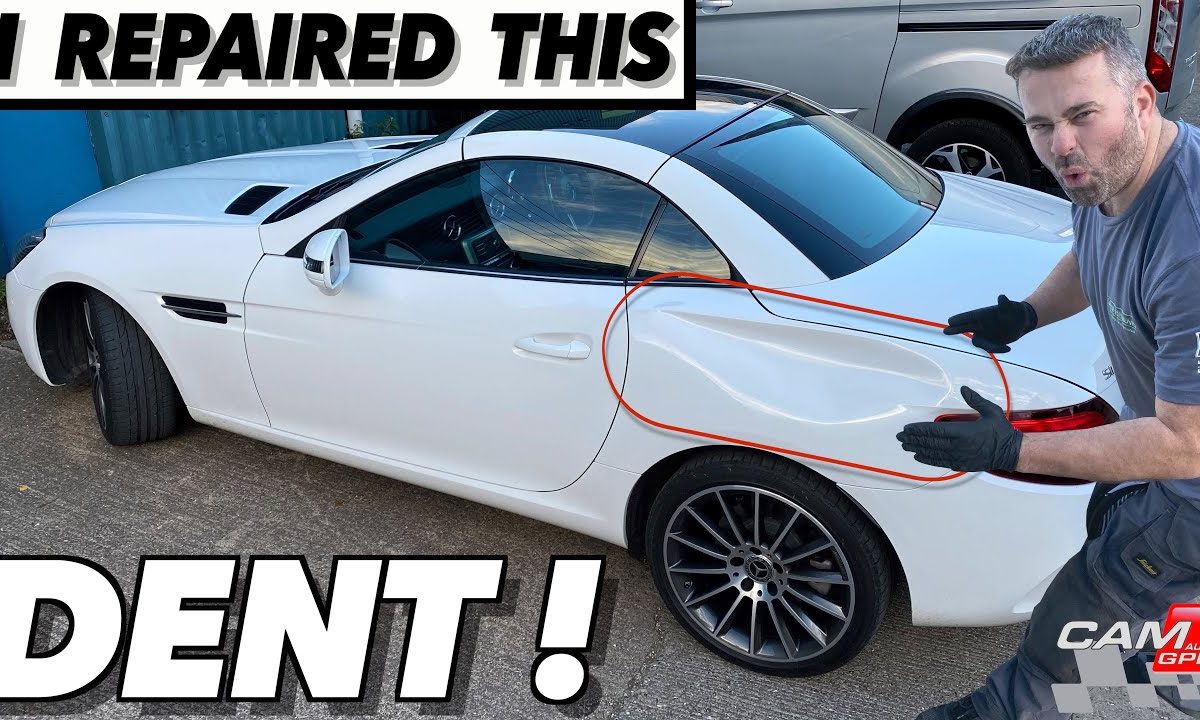
In this article you’re going to see me try and repair a Mercedes, SLC rear quarter panel and save it from The Body Shop. Here it is, I’m Martin Sadler from Dent-Remover and welcome along to another paintless dent removal. article this time, I’m also accompanied by Tom Lusted from Learn PDR Online.com he’s the chat behind the camera filming it. As I go along offering me a bit of encouragement and is really good at making coffees, so let’s go and have a look at the damage in a bit more detail, I’m going to explain the damage in a bit more detail. So, let’s look at the main factors for estimating this repair.
So what we need to do first is measure it and horizontally or side to side. It’S 730 mm top to bottom. It’S 240 mm. It’S a steel panel, it’s a very deep dent and there is four main crowned areas. The first crowned area is towards the rear of the panel, just above the light. The second one is towards the front of the panel, where the door is the third one is at the bottom, where the wheel is, and the fourth one is at the top, which is also above a factory body line. Luckily, this hasn’t really been affected. It’S just rolled the top a little bit, so it does need a little bit of attention Accessing the damage from inside. Well, I’ve already had a look already and there’s no access by removing that tail light. There’S no holes there, there’s no access that way. Also lifting up the tailgate there’s a trim that runs along the top here, there’s no access there, sometimes on other vehicles. There is little holes there, which can be used to gain access.
But good news because there is good access elsewhere, firstly from underneath the wheel Arch area on this Mercedes, there’s two large grommets which I can get in and I can use those with the hula hoop Another good point of access, which you don’t get on many cars. But you do want Mercedes, SLC and SLK is in the door shut by simply unclipping. The rubber trim reveals three or four nice holes. Okay, so I’ve explained all the different areas of this damage and I’ve also looked at the access areas, good and bad. So what kind of repair methods am I going to be using to repair this damage? Obviously without painting it? So, first of all, I’m going to be using the glue, pull repair or GPR. Basically, I’m going to be using hot glue to pull this damage out and reduce it.
Once it’s reduced, I’m going to be using PDR paintless, dent removal using bars and tools to carefully tweak out the damage and get it looking as best as possible And finally, PLAN OF ATTACK.
What is going through my head? Looking at this damage, how am I going to start this repair? Well, the deepest part is highlighted in green, so I’m looking to pull around this area, I could either go just underneath the body line, hopefully the rest of it will pop out so to speak, or i could go slightly above the deepest part, which is a bit Lower down and hopefully again, the majority will flow out once I start pulling, but if you’re looking at this damage – and you think you would repair it differently – please let me know, and we can talk about it in the comments below for the first pull, I’m going To be placing the tabs right underneath the body line using these three long plastic tabs with the strong hooks, also I’m using the pro elite, lightweight puller, all from CAMAUTO and then in the center of a pull. I’M going to be using my pulling Tower..
Okay, can you see that
.. Before I get started with glue pulling, I need to make sure that this panel is clean from any kind of polishes and waxes. So I’m using a 99 isopropanol spray and also a brand new cloth, make sure that that panel is nice and clean and decreased and also giving the tabs a quick spray just to get rid of any residues which may stop the tabs from sticking ….
So I’m just gon na pop all the glue on there like that Right, then Top or Bottom Il go to the top first …. Just stick it to the panel. Keep the tab onto the panel just for a couple of seconds, so it doesn’t um release and put little air bubbles between the tab and the panel. Here we go number two again lots of glue on there plenty of glue.
Like I said, get your fingers in there push it in make sure it sticks. Well, …
Put these bars these bars that are going to help me, pull the tab and pull the damage out. We’Re going to stick these through, like that feed them all the way through and set this up on the first on the Middle tab, sorry and then the bridge puller, So this bridge puller is very lightweight. Obviously I’m using it with one hand. I have set up a secondary puller and hook it on like that into a center of both tabs and then using my um, using my drill just going to take the slack up, let’s get it in the center of that one right. I’M happy with that! Now Drill sounds Ok here we go.
.., so you just want to get the camera in there a little bit yeah. Can you see that so that is all this tension under it’s under tension now, just gon na Jack that a little bit more whiz this up a little bit more Drill, sound Drill, sound Drill, sound The audio is bad because i had my Mic set too loud. …
Sorry Right, then, so I’m just going to release that now get rid of that Pulled it quite a bit. Didn’T it pulled the car over quite a bit too right, so that’s not going to pull much more on there. So what I’m going to do now is get rid of all this and stick it underneath and that should that should pull more out, like I say, there’s no script to this there’s no right away and wrong way of doing it. You just got to try it. It’S trial and error, and that’s not working for me, so I’m Gon na Change tactics. Okay, so we saw that the first pull, although it did pull a little bit out, it didn’t go how I wanted it to so. I’Ve re stuck the the tabs on lower down now and I’m just going to set up this pulling Bridge, I’m just gon na hook, both those under and I’ll just take up the slack just move that foot over a little bit. You can see how the feet are going to the Contour of the panel. That’S important, because if it doesn’t go to the Contour, then you’re likely to put more little dents in as you as I put the pressure onto the damage. Okay. So here we go round two “ action”.
If you just want to have a look on under there as well, because I’ve got the light on there. I’Ll just see how this reacts Drill sounds Thats, the first one and I’ll just whizz. This one up Drill, sound and just hook. Those on like that This hook set up is from CamAuto, okay right. Let’S pull the center of this damage out then right. That needs a bit more on this one. On the left-hand side, Drill sounds it’s popped out. Hey look at that drill sounds
Nice one so …
Well, it’s it’s gone. How I wanted it to go! Majority of this has been pulled out. It has slightly over pulled it a little bit. I could do with a bit more of a pull-on there yeah looking good Everything is still under alot of tension. Ive just got to go careful under this area Because i dont want it to pop off and hit me on the head. It might knock some sense into me.
So im going to stick Flat tab the CamAuto flat tab onto the bottommost part of this Dent, which runs down here and then there’s another one there. So this should come out pretty well because the the panel is under tension already. So that is going to help the the damage come out. That’S one on there, let’s go and get another one. I’M gon na use a slightly smaller one for the other dent …. There you go. You want to put enough glue on there so that when you do stick it onto the panel there’s a light, a slight bead that just goes around the the edge of the tab. Okay, here we go: Bang bang bang, So that is popping back in a little bit. So there is still some tension. There Just use the blending hammer So this here, that’s a crowned area so that there is a bit of tension in there and what a crowned area means is. The panel is slightly high and holding locked tension. Tapping sounds
Like this article, Please Subscribe to our YouTube Channel. What i’m about to do now is get the panel wipe on there and just remove all of this, and let’s see how we’ve done just before we Analyze This repair. If you are enjoying this article so far make sure you tick that subscribe button and don’t forget the notification Bell and then you won’t miss any of my future articles. Okay! So after that um after that large pull I’ve wiped all the glue off and I’ve inspected. It with the quality control board and the fog board just to see where the lowest areas are and what he’s repairing next. So there is three main areas: we’ve got a creased area here here and here this is the deepest part of the damage now, and so I need to use some crease tabs to pull the damage out once I’ve got tension on this one. There’S a crown here. So I need to tap that bit down once we’ve got tension on this, I’m going to tap this crown down and also just address this one as well, but I mean this isn’t too much of an issue unless this doesn’t want to stay out. If this keeps popping in and out, then just tap that bit down, but yeah, I’m happy with that wipe this all off. Stick these CamAuto glue tabs on and see how it goes. The tabs I’m using here are the CamAuto 3D tabs and they have bendable side wings. Also I’m using the Cam Auto hot glue, and this is the strongest PDR glue on the market. At this moment. In time, More drill sounds [ Tom speaking ]. That’S brought the bodyline area down a bit did’nt. It
I’M going to stick the tab. …
There choices choices so with these tabs you can actually use them in a body shop. So you’ve got a miracle puller where you weld these tabs on. You know, so you take the paintwork off and you weld these tabs on. That is exactly the same ring as the Glue version, so you don’t need to take the paintwork off the vehicle. You can just stick these directly onto the damage and it just saves you all the hassle of well. You know getting it ready, taking the paintwork off in the first place, but once you get used to actually doing this method of repair, you might get to a point where you don’t have to take the paintwork off and you can repair the dent. Paintlessly is that gon na work yeah. So we’ll do this one first, because it’s it’s properly set, I’m just going to adjust. …
The puller pull this one onto the edge onto the door Edge, because that is the strongest part of the panel. Let’S take a slack up, you can even do it by hand anyway, it’s it’s um. It’S not hard at all to lift this damage out just by using the..
Ah, did you see that there that’s just come out nicely wow, that’s come out real! Well that ( laugh )! You just want to run the camera through there. If you can, I mean that Crown’s worth knocking down now you see it. Look all that there it’s come out really well, so I am going to take the opportunity to knock this crown down while it’s under tension tapping, There’s alot of tension around this part. The crowned area is quite tough, actually um, so it’s just trial and error. Anyway. I’Ve got it quite close to the crown I’m gon na pull it with a slide. Hammer see how it reacts and carry on…
Bang, bang, bang it’s a lot better, just sort that Crown out a little bit Hammer time just trying different spots every time. So I was I was in the middle first then I went to the end and I’m going to the top. There is certainly some locked in tension around there somewhere because that is strong as hell. So what is …
…, what is holding that in There’s a bit of a crown above it
There Yeah around there yeah a bit there, i’ l, try down here. …
Hmm, I don’t know it could be yeah do the upper crown from the back of it would be nice yeah Tap, tap tap wow. That is absolutely solid. Tap, tap, Bang, Bang! Hey there! We go it’s starting to come out now.
Its a good job Tom Lusted is here, give me a hand today, wise words and encouragement go back just between that first crowned bit and the bit that I’ve pulled out and meantime. I shall smack this very strong crown down. Oh you can hear that. So that’s just popped in so just just shows you does’nt it blending noise get rid of that …!
The glue that I’m using here is, I think, it’s ninja dent medic, I think um, so the dark green one, which is really good peels off very nicely. Okay. It probably looks totally disgusting on camera, but um, I’m happy with the progress..
.. now il put a Gangrene tab on there. Just in that area there …
Ive got all that to tackle yet ( nervous, laugh, ), a few more pulls on here and then I’ll. Just change direction and start working from this um. This far Edge in slide hammer bang just tap down a few of those crowns. You can just hear how um how strong it is in this area compared to somewhere, like this ( more spring and less tension, ), okay, right, I’m gon na move change directions and do this area. Now this damage does look horrendous and it looks like there’s no light at the end of a tunnel, but I can see that light.
But first I’ve got to pull this area out more hammering bangs and hammering …
So switching sides: I can see the damage from a different angle, I’m carrying on glue pulling it there’s a few areas here that just need to be smoothed out and I’m feeling it with my hand. It is getting there
I opened the door as well because I like to get my arm in there when I’m looking down, and I realized that there is another point of access, so we have got a trim here. Okay, you pull this off and we’ve got these lovely holes and these holes I can get to the full quarter panel from the inside, so just using a dent bar like this, a DENT SLAYER Bar.
So I’ve got a few ripples up here, go straight through this hole like that. So the hole is look at that, so I can reach that bit and again. I can go all the way through the other points of access that I have got.
I’Ve got the Grommet under there, so I can get the hula hoop bar in there, and I can reach from from about here to here and again just want a little bit further backwards. So I can reach the full quarter panel with the bars as well, but I’m still going to carry on with the glue for now so now that I’ve got access with the bar. I’M making great progress just fine-tuning this area here so about six or seven inches. Where, if it’s all it’s all nice and laid really well, there’s still quite a lot of work, but I need to do with it and you know fine tune it and take out those micro lows. But for now it’s you know: it’s going great, just working my way to the middle.
It’S a bit pickly around there, the back out reach that far, but I can use the hula hoop bar yeah. Well, it’s it is it’s looking nice! So we are. We are winning at the moment. I’Ve just got the other bar in got a Ultra Dent tools, double screw tip bar, so I’m going straight through the grommet, which is there and just smoothing out all that damage. So, just going through that and Grommet hole there you go. If you see it up there plenty of Leverage. There got plenty of space, Make sure you like this article and subscribe to our channel tool.
Getting there isnt it mate, The shape is there now …
Its all there … .It just needs all those “ ripples” sorting out
I’Ve been going over the bulk of the damage, with a really fine tipped bar just taking out all those micro loads just trying to get it as smooth as I can, but what I need to do now is: I just need to pay attention to this far Left edge here, it’s uh, it’s still a little bit in so I need to go through this hole here with the bar can get right on it. I just need to warm it up, though, because it’s quite near the body line and just tweak it out and it’s coming on really well, so I’m not far off now and I think I’ve saved the panel from any kind of paint work, tapping noises Right.
Ok, i’m back onto the rear part of this panel, the crown that was here originally, I thought it was. You know, going to be pretty simple to just knock down, but there’s so much strength in the back of this panel. It’S quite unbelievable really, so this is taking me a little bit of time to get right, but there a few waves there look can see that. But you know I’ve got these these tabs on here and it is coming out so just keep plugging away at that.
So I’m still tapping and tapping and tapping going from each Direction, just cross, checking and just trying to lay down this panel as smooth as possible. I am using a couple of very, very sharp knockdowns, but not plastic or nylon, tipped like this one. So these are just polished, steel tips, I’m using a VIP one there and I’m using a very, very sharp one Allen, Wilson, ( PDR BEGINNERS ON FACEBOOK. )
gave me that one. Thank you very much. It comes in very useful and basically, what I’m using these for is, for those very very micro highs, literally just tapping in between each bit of orange, peel, really, which gives it it. It will sit a lot flatter I’ll, just show you. It might look a little bit Wiggly or rough. I don’t know but take that away and it looks totally different even now, if you just run your hand over it, it’s very smooth all the shapes there.
So we’ve got this kind of um Arch shape to it. It goes concave here, which is how it’s meant to, and it’s convex. So it’s like an outward um outward shape now, which is totally opposite to what it was about six hours ago And so for the low areas I am using. My hula hoop bar fitted with a gator v-tip on the end. These are all really common tools I use in a lot of my articles. I always use the same kind of tools, uh very good. It’S super sharp and I can just be very, very accurate with with my pushes …
So I’m working around here just sliding the hula hoop in like that using the The Grommet Hole as Leverage and it’s giving me some very nice. Direct, no precise, pushes more tapping
Well, that certainly tested us, but the end results are amazing, ultimately saving this vehicle from any kind of paint work, which is what our customer didn’t want and when they picked it up, they, where super happy with the results themselves. So if you DID ENJOY the article it’d be great to get a THUMBS UP And if you haven’t SUBSCRIBED already, please do because it really does help. My channel grow A BIG thanks to Tom lusted. He made the trip all the way from Devon. To help me film this and a lot of encouragement, a lot of help is really good at making Coffees aswell …, and it is a super cameraman. An all-out awesome guy Tom also offers PDR training online.
if you want to get into PDR, make sure you check it out and the links are in the description below And finally, a massive shout out to CamAuto Pro. This kit is amazing, so simple: to use whether you’re a PDR technician or, if you’re in the body shop, if you’re a panel technician you need this gear. The glue is the strongest on the market for tabs absolutely bomb proof and that Pro Elite Pulling bridge. Something else that made a light work of that repair.